As a supplier of Stump Grinder Parts, I've seen firsthand the importance of maintaining and replacing worn - out parts in stump grinders. One of the most common tasks is removing a worn - out cutting tooth from a stump grinder. In this blog, I'll share a detailed guide on how to do this effectively.
Understanding the Stump Grinder Cutting Tooth
Before we start the removal process, it's essential to understand the role of the cutting tooth in a stump grinder. The cutting tooth is the primary component responsible for grinding down stumps. Over time, due to continuous contact with hard wood and debris, the tooth can become worn, dull, or even damaged. When this happens, it not only reduces the efficiency of the stump grinder but also poses a safety risk.
Tools Required
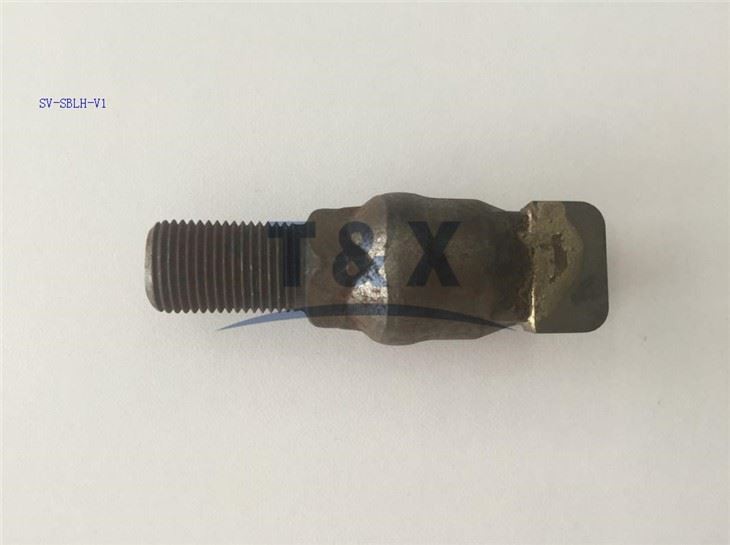
To remove a worn - out cutting tooth, you'll need a few tools. These include a wrench, a socket set, and a hammer. Make sure to choose the right size of wrench and socket that fit the bolts holding the cutting tooth in place. You can find a variety of Stump Grinder Bolts on our website to ensure you have the correct ones for your stump grinder.
Safety Precautions
Safety should always be your top priority when working on a stump grinder. First, make sure the stump grinder is turned off and the engine is completely cooled down. Wear appropriate safety gear, such as safety glasses, gloves, and steel - toed boots. This will protect you from any flying debris or sharp edges during the removal process.
Step - by - Step Removal Process
- Locate the Cutting Tooth: The cutting teeth are usually located on the grinding wheel of the stump grinder. Identify the worn - out tooth that needs to be removed.
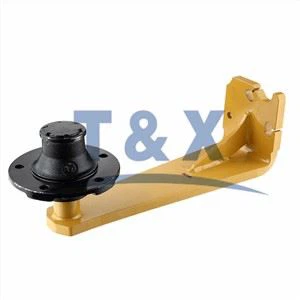
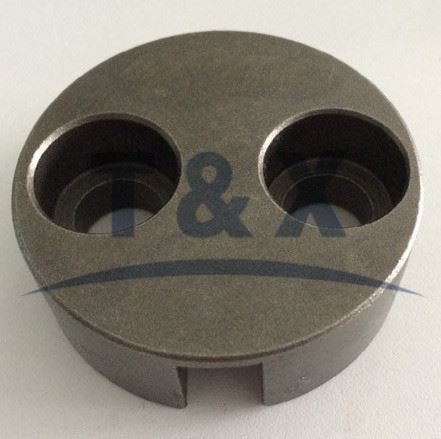
- Inspect the Tooth and Surroundings: Before removing the tooth, take a close look at it and the area around it. Check for any signs of damage to the Stump Grinder Pockets where the tooth is mounted. If there is any damage, it may need to be repaired or replaced as well.
- Loosen the Bolts: Using the appropriate wrench or socket, start loosening the bolts that hold the cutting tooth in place. In some cases, the bolts may be tight due to rust or debris. If this is the case, you can use a penetrating oil to help loosen them. Apply the oil to the bolts and let it sit for a few minutes before attempting to loosen them again.
- Remove the Bolts: Once the bolts are loose, carefully remove them and set them aside in a safe place. Make sure not to lose any of the bolts as they are essential for reinstalling the new tooth.
- Extract the Tooth: After removing the bolts, gently pull the worn - out cutting tooth out of the Stump Grinder Pocket. In some cases, the tooth may be stuck due to debris or corrosion. If this happens, you can use a hammer to gently tap the tooth to loosen it. Be careful not to damage the pocket or the surrounding area.
- Clean the Pocket: Once the tooth is removed, clean the Stump Grinder Pocket thoroughly. Remove any debris, sawdust, or rust that may have accumulated in the pocket. This will ensure a proper fit for the new tooth.
Choosing a Replacement Tooth
When it's time to replace the worn - out cutting tooth, it's important to choose the right one. There are different types of Stump Grinder Teeth available, each designed for specific applications. Consider factors such as the type of wood you'll be grinding, the size of the stump, and the power of your stump grinder.
Reinstalling the New Tooth
- Insert the New Tooth: Carefully insert the new cutting tooth into the Stump Grinder Pocket. Make sure it fits snugly and is properly aligned.
- Reattach the Bolts: Once the tooth is in place, reattach the bolts. Tighten them securely using the wrench or socket. Make sure not to overtighten the bolts as this can damage the tooth or the pocket.
- Test the Grinder: After reinstalling the tooth, it's a good idea to test the stump grinder. Turn it on and let it run for a few minutes to ensure that the new tooth is working properly. Check for any unusual noises or vibrations.
Maintenance Tips
To extend the lifespan of your cutting teeth and other stump grinder parts, regular maintenance is crucial. Here are some tips:
- Clean the Grinder Regularly: After each use, clean the stump grinder to remove any debris, sawdust, or dirt. This will prevent corrosion and damage to the parts.
- Inspect the Teeth and Pockets: Regularly inspect the cutting teeth and Stump Grinder Pockets for signs of wear or damage. Replace any worn - out parts as soon as possible.
- Lubricate Moving Parts: Apply lubricant to the moving parts of the stump grinder, such as the bolts and bearings, to reduce friction and wear.
Conclusion
Removing a worn - out cutting tooth from a stump grinder is a relatively straightforward process if you follow the right steps. By understanding the components of the stump grinder, taking the necessary safety precautions, and using the right tools, you can ensure a smooth and successful removal and replacement process. As a supplier of Stump Grinder Parts, we offer a wide range of high - quality Stump Grinder Bolts, Stump Grinder Pockets, and Stump Grinder Teeth to meet your needs.
If you're in the market for stump grinder parts or have any questions about the removal or replacement process, don't hesitate to contact us for a procurement discussion. We're here to help you keep your stump grinder in top condition.
References
- Stump Grinder Manuals: Most stump grinder manufacturers provide detailed manuals that include information on maintenance and part replacement.
- Industry Publications: There are several industry - specific publications that offer tips and advice on stump grinder maintenance and repair.